Wednesday, October 3, 2012

A Dresser Redo - Part IV

It's finally over, I promise!  The dramatic conclusion to the dresser is here! 

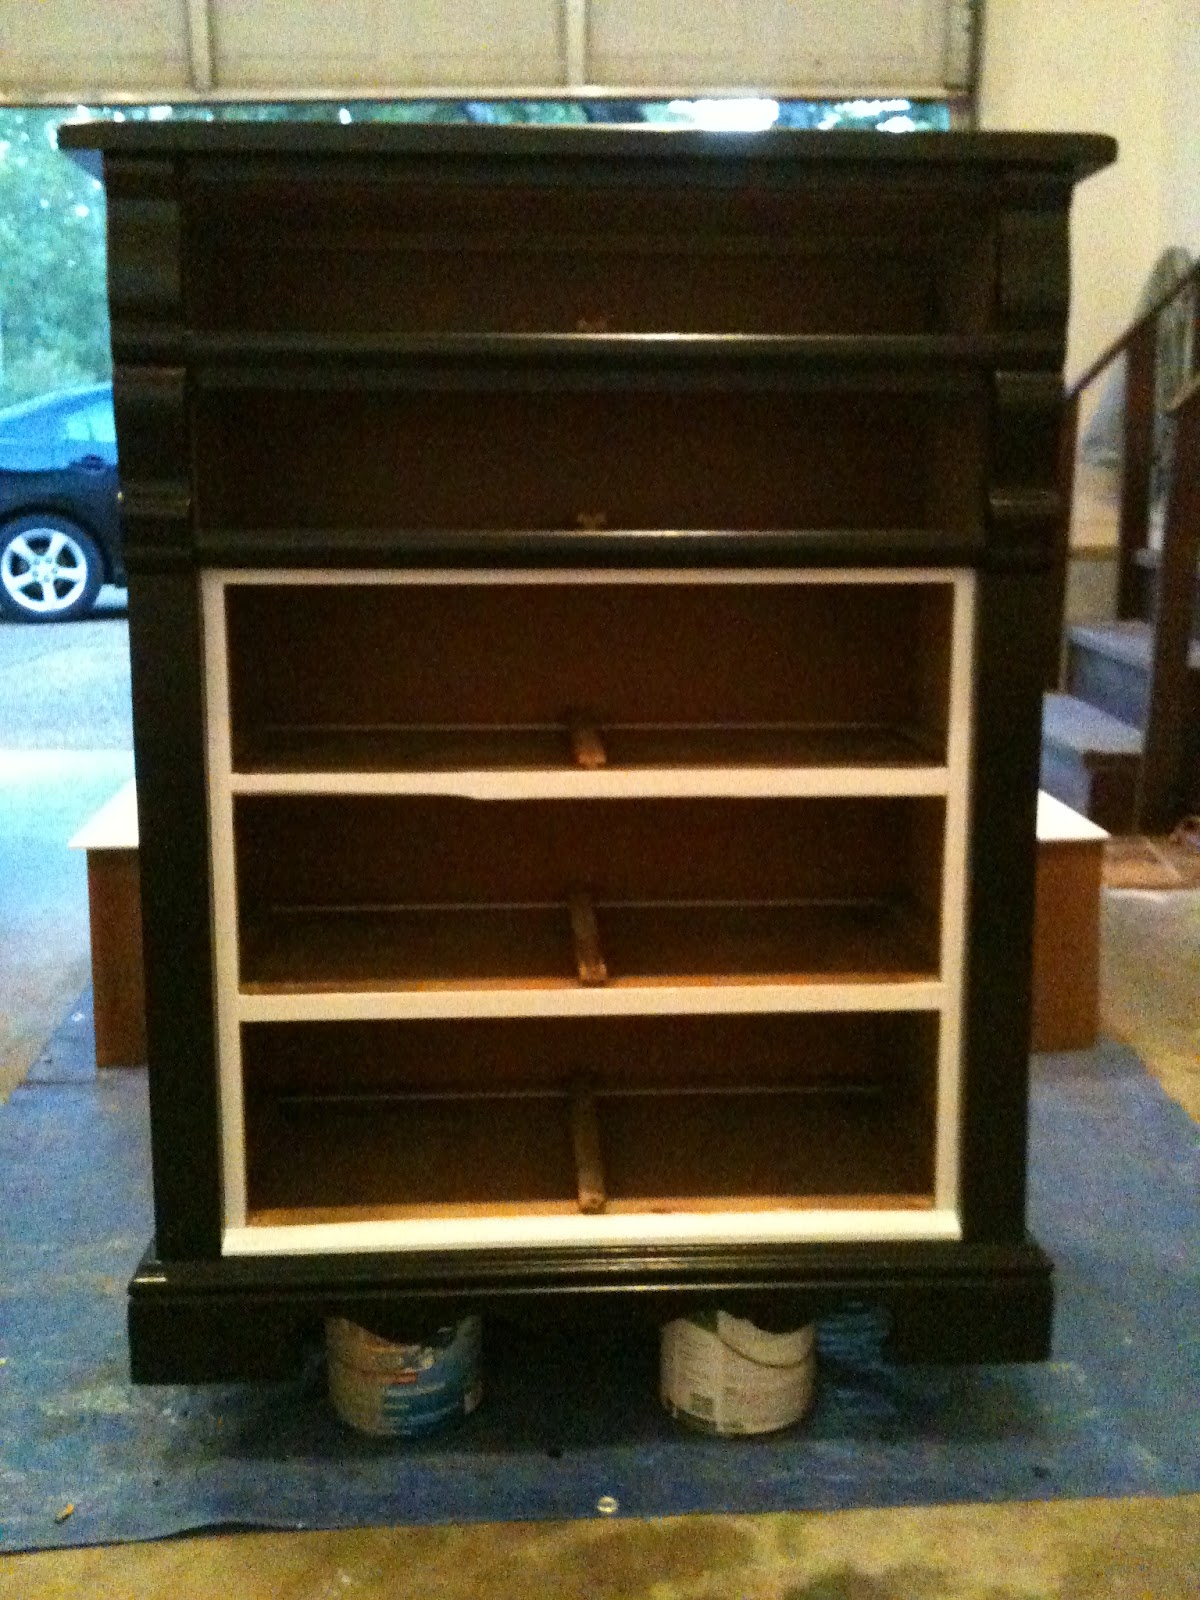
I know left you on the edge of your seat wondering how I would fix the large missing chunk of wood.  Here you go . . . I covered it up.  

I went to Micheal's and bought a piece of 3" x 36" x 1/16" balsa wood.  The shelf in question was exactly 1", but unfortunately all the pieces of wood at Micheal's, Home Depot, Lowe's and Ace that were 1" wide were way too thick.  Luckily, balsa wood, especially that thin, is easy to cut using a knife.  I did just that, and  I cut it long enough to cover the entire length of the front.


Next, I painted it with a few coats of white and polyurethane to match.

Then, I glued it to the dresser using Krazy Glue.  (Well first, I dropped a hammer on it accidentally and had to start the whole process over.  Thank goodness for the extra wood!)  The wood is so thin, you can't tell that it's even there.  I made sure to line it up with the existing breaks.


In case you have forgotten, here's a before and after shot.


There were some unique challenges to this one, but I like to see them as learning experiences that will help me with my future projects.  :)  Besides, the transformation was worth it!


Tuesday, October 2, 2012

Top 10 - Things I Love About Fall

I LOVE FALL!  I'm sure I'm not alone in saying that it's my favorite time of year.  As we enter the wonderful season that is autumn I have somehow managed to condense all my loves down to ten.  Hopefully, you share at least one! 

1. The Weather - The days are finally not sweltering and the nights are cool.  The air seems crisper and easier to breathe somehow.  You can have the windows open both at home and in the car (sorry people who can now hear me singing at the top of my lungs).  The 100 degrees with 100% humidity days of July and August are quickly forgotten and finally, it's 63 and slightly cloudy and, in the words of Cheryl Frasier, ". . . all you need is a light jacket." (Or sweater, or hoodie, or scarf.  Which leads me perfectly to #2.)

2. The Clothes - Boots, Scarves, Hats, Sweaters, Tights, Mittens!  All the wonderful soft warm things that have been hiding all summer can come out to play.  Not to mention, as someone who LOVES layering, this is my season.  Added bonus, a sister who knits!

Thanks for the Captain's Hat Sara!

3. The Smells - Noses rejoice!  Maple, apple cinnamon and pumpkin are here!  They smell tasty and warm and make me want to curl up in a blanket while eating something made of them. 

4. The Seasonal Food - There are certain dishes that appear only once a year.  
J. Christopher's Caramel Apple French Toast, I'm talking to you.  Thankfully, Starbucks finally relented and put Caramel Apple Cider on the menu all year round, but it used to be a seasonal drink also.  Delish!

Looks yummy, huh?
 5. The Return of Football - It's finally here!  Grown men in tight pants pounding each other to move a silly shaped brown ball 100 yards.  Ah.  I like many sports, but for me, nothing beats football.  Defenders, please stop tackling like wussies and WRAP HIM UP!  Go Cowboys!

Witnessing the very first kickoff of the college football season, right here, at our little Vanderbilt.  Go Commodores!
6. The World Series - I'm going to add in all of the baseball playoffs.  7 months and 160ish games ago, baseball started and now it all matters.  You've seen my doormat, we watch plenty of baseball in this house, but this is the best part.  Wild card races and play-off runs all culminating in a final show down of the season's two best teams.  Plus, with that crisp air, the crack of the bat seems crackier, the grass seems greener and players of all ages and experience can do amazing things.    

Okay, so it's not at a playoff game, but it is still during fall at Petco Park during our trip to Coronado Island.
7. The Pumpkins - With the exception of pumpkin pie, (I don't like carrot cake either.  No vegetables in my desserts please.) I love everything about the pumpkin.  I love carving it.  I love sticking my hand in to pull out the wet disgusting guts and picking out the seeds to later bake and eat.  I love the smell of pumpkin spice candles.  I love that you can stick one on the front porch, unaltered in anyway, and it's considered decorating.  And, most of all, I love It's The Great Pumpkin, Charlie Brown.  

Last Halloween's Rapunzel Pumpkin.

8. The Leaves - The colors are magnificent!  The yellows, oranges and reds light up the trees as if nature is saying one last time that it's vibrant and bright and will back soon. Stanley Horowitz cleverly stated, "Winter is an etching, spring a watercolor, summer an oil painting and autumn a mosaic of them all."  I spent last weekend Leaf Peeping in Vermont and New Hampshire with BF Olivia and it was incredible.  Who knew that driving around looking at leaves was a vacation, and an amazing one at that?  (A word of advice from Linus Van Pelt, "Never jump into a pile of leaves with a wet sucker.")


B-E-A-UTIFUL!  Courtesy of shutterbug Olivia.

9. The Holidays - Halloween.  Thanksgiving.  Dress up.  Stuff your face.  'Nuff said.  :)

Us three and the mom all dressed up for tricks-or-treats.

10. The Fires -  Call the chimney sweeps because it's time to light up the fireplace!  (Add this to the list of smells, too.)  Nothing beats the glow of a fire to warm me during a chilly evening.  Add a cup of apple cider and a snuggie with a Charlieface underneath and I will not be moving. 

Happy fall everyone!

Wednesday, September 26, 2012

A Dresser Redo - Part III

Part III is here!  Are you excited for the conclusion of this dresser redo?  

Moving right along . . . 

As mentioned in Part II, I allowed the final coat of white paint to dry overnight before taping.  Then, I painted on my second color, black.


I know there are lots of tricks to getting the perfect line with tape, but sometimes the easiest thing to do is just to touch up where the paint leaked under.  One thing to remember is if you are using anything but flat paint (eggshell, semi-gloss, etc.) make sure to score the tape before taking it off.  If you skip this step the tape is bound to take with it large chunks of paint!  Here is what it looked like after taking the tape off.


After letting everything dry overnight, I did one final coat of water-based polyurethane.  If you want your white paint to stay white, make sure to use water-based poly.  Oil-based poly has a tendency to yellow over time.  On top of stain and dark colors, the difference is negligible, but on white, you'll notice.  I let it sit just one more night before putting it all back together.  I bought new hardware, black, to match the trim.  Drum roll please . . . .


Oh no!  Do you see that too?  I knew there was a chunk of wood missing from the frame, but I honestly though that the drawer would cover it!  Self, always double check!   


There are always a few final touches that need to be done once I've reassembled a piece, but this is a little bit more than I expected.  At first, I was angry and exasperated with myself, but I am nothing if not a problem solver.  So, I guess there IS going to be a Part IV.  Sigh, :)

Monday, September 24, 2012

The Most

Not only am I the oldest sister...the most beautiful sister....the most intelligent and talented sister, but I am also the nerdiest sister. (And I say that proudly!) I bring it up because Halloween is on it's way. I love Halloween! Last year, Jake and I decided to dress-up together. Not quite like couple costume "together," but with a common theme. So, he was The Doctor and I went as Amy Pond. (Doctor Who is our show. Definitely quality mother-son geek-fest bonding time.)


Here he is channeling his inner-David Tennent. (Sorry, no picture of my costume...athough, that blurry blob on the left is my arm. :)

It turned out that we had TWO Trick-or-Treating events last year, so we decided to mix things up a bit for soiree Number Dos.


Amy Pond and her sidekick ;) fighting The Silence. We battle evil with our positive outlook and cheery smiles. (I love Abbie's face in this one! "Must...have...sonic...screwdriver...)


(I just had to add this one for fun. That face of pure joy just kills me! Makes you want to give her anything just to see that face, doesn't it?)

Anyway, Jake and I had such a good time in our joint costume venture, that we decided to get the whole family to play along this year. We brainstormed a few themes, and Kaylie has decided that this year will be...Star Wars. That's right, folks. Rapunzel has spoken and don't call her Rapunzel. It's Padme this year. :)

So, keep your eyes glued to this spot for dork-tastic costume-y goodness. Trust me...it's gonna be good! (There might even be a real couple costume this time around. Wink wink.)


Wednesday, September 19, 2012

A Dresser Redo - Part II

As promised, the redo continues. . . .

To ready the rest of the dresser for primer, I did a quick sanding over everything.  I use a power sander whenever possible as it makes quick work of the large flat surfaces, but this piece has quite a bit of detail that had to be sanded by hand.  When you are painting, stripping the piece to the bare wood isn't necessary.  You just want to rough up the surface to give the primer/paint something to hold on to.  Some would argue that since I am using primer, I don't need to sand at all since the paint will adhere to the primer, which is true, but I like to create as uniform surface as possible by sanding out all the aforementioned nicks and scratches.  


Next, I primed everything.  I like to lift the furniture of the floor so I can reach the very bottom and it won't get painted or stained or whatever to the drop cloth.  Paint cans work great. 


 I'm going to be painting a two-toned color scheme (black & white) so after the primer dried, I started with the white paint.  Always do your lighter color first.  


Before taping, I suggest letting the paint dry overnight.  More to come! 

Monday, September 17, 2012

You've got Something on your face....


 ...right...here. :)


 Is it just me, or does everybody have those days.


The ones where you have this nagging suspision that something is just not right and it feels like everyone else can tell and is staring right at you?


I've checked my teeth in the mirror. Nothing there. Toilet paper stuck to my shoe? Nope, not that either.


I pull a super-sneaky-fly-check. Hmm...my zipper's right where it should be. What could possibly be the problem!


Maybe it's something bigger. Certainly no one can tell that I'm upset at myself for not being strong enough, good enough, patient enough. Maybe I'm just being paranoid?


And then, I look at these little faces. They don't care that I'm not perfect. They just care that I'm Mom. That I'm here. That I love them. All. The. Time.


So, while others staring at me might just be in my head...there is still some staring going on. Cause I can't keep my eyes off these two!


(Success! Found the fork at last!)


Wednesday, September 12, 2012

Jenni's Chairs

While I was visiting the family this past week, Jenni asked me to update a pair of her chairs.  The story of how she got them has many versions (isn't your family like that?), but from what I gathered, my mom got them for free from her old office, took them over to Jenni's when she first got married and left them.  They did need a little help.  

Here is what they looked like before:


One arm needed a little bit of gluing.


It's not like they are in super horrible shape, but they certainly aren't Jenni's style.  She picked out the fabric and paint color, and I did the work.  Well, most of the work.  I did do all the painting, but the thing about using someone else's garage to work in is that you use someone else's tools. The staple gun that my mom gave me at first was way to big for my little hands and I had to use two hands just to press down and therefore couldn't hold the fabric tight at the same time as stapling.  We found a smaller gun, but problems still ensued.  Enter the mom.  She held while I stapled. 

This is us working.


This is Jenni working. :)


I confess, she did cut off the excess fabric and tell us what staples had fallen out. Silly chairs and their lack of equal wood frame around the seat cushion. (P.S. Thanks to best friend Olivia for taking the pictures that I knew nothing about at the time and clearly came in handy later!)

All in all, I think they turned out pretty good.  Nothing like family teamwork!


Much more cherry.  I mean cheery!

Don't you agree that Jenni and Sara are lucky to have me?  ;)

Tuesday, September 11, 2012

Audrey's Airport Advice - Top 10

Earlier this week I returned home from my fifth trip so far this year.  No, I am not a business traveler, but I do travel more than the average person.  I still have two more trips to go before the calendar runs out.  I thought I would share some knowledge that I have obtained over my many, MANY airport visits.  They all will help your next vacation go smoother, and you keep you from becoming the person everyone else "canNOT believe!"  Happy trails!


  • Have your boarding pass and picture ID already out when you get to airport security.  It WILL get checked!  Fumble for it while you are waiting in line, or better yet, before you even get in line.  It may seem like a no-brainer, but if I had a nickel . . . 
  • Please do NOT try to take a water bottle, or any beverage,  through security.  I have seen even people who seemingly have it together with their other liquids at regulation size (3 ounces) and in a one quart bag try to bring drinks through, including a barely sipped, freshly made frappacino.  It does not matter if it has an unbroken seal.  It really does not matter if you just bought it.  My favorite water bottle encounter includes a TSA worker stating to the woman in front of me, and I quote, "Lady, where have you been?"  
  • If you haven't flown in a while you may not know there are now full body scanners in addition to metal detectors at most airports.  You will be directed to walk through one or the other, but more often than not, you'll get scanned.  They require you to stand still with your hands over your head for three seconds.  Don't try to simply walk through them.  You'll hold up the line and have a cluster of security around you instantly.  Another tip for body scanners, clean out your pockets.  Even a tissue causes an issue.  :)
  • As you move about the airport, pull over if you need to stop.  People move very quickly in airports and you'll probably get run over, cussed at, and most definitely given the "Are you seeing this?" look.  The aisles are wide.  There are gates everywhere.  Need to get something in your bag?  Need to text?  Think like driving and pull over. 
  • Take Airborne(R).  Like I mentioned, I have flown A LOT.  I used to get sick after every flight.  Planes are flying germ aquariums.  Since I have started taking Airborne, I no longer catch the traveler's cold.
  • Practice lifting your carry-on bag over your head.  If you are bringing a carry-on that has to be put in the overhead bin, make sure you can lift it that high.  It is much easier to drag a bag off the conveyer belt, so if you can't lift it, check it. 
  • Pack a snack for the plane.  You can bring food through security.  And remember how I told you not to bring a water bottle through security?  Buy a drink once you get through.  Of course you are going to get a free beverage and peanuts on board, but sometimes (like last Wednesday night) you are delayed once you have boarded the plane and have to sit for an hour before take off.  No food or drink until you have reached 30,000 feet.  ***Please refrain from stinky snacks.  Those with weak flying stomachs do not need added grief.  Remember, small confined space.  Eat the peppers at the gate.
  • Bring a sweater.  Some planes are hot.  Some planes are cold.  Unlike Goldilocks, no plane I've ever been on is just right.  Make sure to wear layers so you can adjust to the temperature.  I've been hot on a plane that has the air going full blast and cold on a plane where my air valve is shut.  Also, thanks to the outbreaks of the flu and other diseases, most airlines no longer offer blankets.  I have had to buy sweatshirts in airports because I forgot my sweater.  And you think buying a drink is expensive!
  • Turn down the volume.  I realize that the plane itself is loud and your ears may be plugged, so I concede that your volume has to be higher than normal.  It does not have to be so high however, that everyone around you is wondering why you have earphones at all since they can all hear your music, show or game.  And please make sure you bring headphones.  Especially for your children's game consoles.  
  • Be patient.  You are in a hurry.  Guess what?  Everyone else at the airport is in a hurry too.  There is something about them that make even those with hours to spare antsy and in a rush.  If you remember to breathe and be patient with others you'll find yourself smiling at the guy who just can't seem to take his belt off instead of wanting to wring his neck with it.  I know it takes practice.  Maybe I'll finally be good at it on trip number six.  :)

Thursday, September 6, 2012

In the Flesh... Kinda

I did some digging and found this beauty! 

 The most recent photo of all three of us together.  It was taken in April.  
Pretty ridiculous that we all had to travel to get one picture together, right?

From left to right:  Sara, Jenni, and Audrey
(The cute young things are Sara's)

Wednesday, September 5, 2012

A Dresser Redo - Part I

Here is my latest project:


It's a bit rough, I know.  Three of the drawer slides have fallen off (thankfully they just need to be reattached, more on that later, Part II perhaps?) and there are multiple scratches and nicks.

The first thing to do is assess the damage.  Yes, I looked it over before I bought it ($10!) to make sure all the repairs were in my (sometimes imagined) skill set, but you can only determine so much in someone's driveway.  Take everything apart, remembering to save all screws and hardware in a bowl/box, just in case.

First up for repair, the bottom two drawers both have missing corners. 


My first brilliant idea to fix them was using wood filler.  I previously fixed a corner on a cabinet box and it worked great.  Once again, I recommend Elmer's.  Really, just make sure that it's paintable or stainable if need be.  (Depending on the project, you can buy wood filler to match a variety of existing colors so you don't have to paint/stain it.)  Here's what I ended up with.  I used tape to hold the filler in place while drying.  Simple, shallow fixes usually dry quite fast, within 15 minutes, and are ready to sand.  I let these dry overnight.  


Unfortunately, my brilliance was short lived.  The minute I went to sand the edges the entire corner popped off!  It was dry alright, just not stuck to the drawer like I had hoped.  Not to be dismayed, I hatched a second even more brilliant plan! :)  I took composite board left over from an earlier project and cut it into small sections.  The kind I have is thin enough that all I needed were scissors.  Next, I aligned the corners of the composite pieces together to fit snugly into the drawer corners and glued pieces together to make it 3 layers thick.   Then, I glued it to the drawer.  Clamps are best when using wood glue, but this was impossible for one of the drawers so I used my trusty blue tape again to hold it in place.


I allowed to glue to dry overnight.  In the morning, I used a small hand saw followed by sanding to get rid of the excess wood.  SUCCESS! 


Ready for primer!

 As I'm sure you noticed, this is only Part I, so make sure to keep checking back for more!