Tuesday, August 28, 2012

To Make or Not to Make? That is the question.

Here are 10 recipes that I found during the past week I want to try.  

Whether I actually get the time to try them is a different question. 

#1 - Pineapple Coffee Cake (recipe here)
(eatingwell.com)
#2 - Skillet Gnocchi with Shrimp and Asparagus (recipe here)
(delish.com/Peter Ardito)
#3 - Peach Ice Cream (recipe here)

(myrecipes.com/James Carrier)
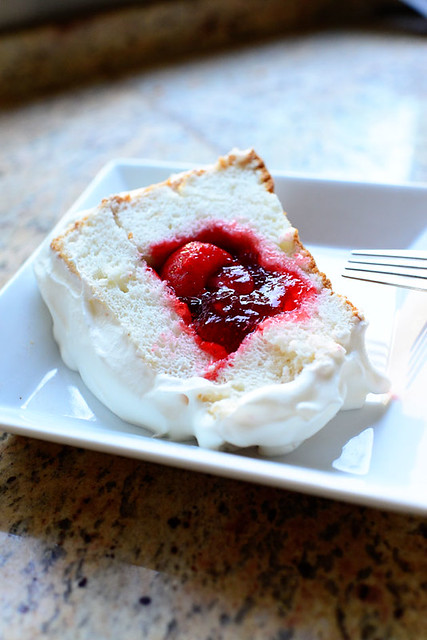
#4 - Strawberry Sparkle Cake (recipe here)

(thepioneerwoman.com)
#5 - Quinoa and Avocado Salad (recipe here)

(For more information re: quinoa visit here)
#6 - Coca Cola Cake from Cracker Barrel  (recipe here)
*For Audrey*

(food.com/WishTrish)
#7 - Spiced Candied Cashews (recipe here)

(mobile-cuisine.com)

#8 - The Lion House Pantry Dinner Rolls (recipe here)

(ldsliving.com/Temple Square Hospitality)
#9 - Chicken Wild Rice Soup (recipe here)

(thegunnysack.com)
#10 - Shrimp Veracruzana (recipe here)

(eatingwell.com)


Thursday, August 23, 2012

Thunder Cake

My favorite picture book as a child is Thunder Cake by Patricia Polacco.  As I woken up by a traditional Arizona monsoon thunderstorm at 2:00 a.m. last night,  I was inspired to make my very own moist delicious chocolate thunder cake.  Unfortunately, my grocery store of choice had been robbed causing a halt to my plan of getting the "secret ingredient."  Bummer!  Who robs a grocery store?  Really?  

Thunder Cake

Official Recipe Here

Wednesday, August 22, 2012

Miracle In a Can?

Spray paint really is amazing!  It turned these:


Into this:


For both of these pieces, the root method was the same.
1. Sand
2.  Vacuum/Wipe Down
3. Spray Paint
4. Ta Da!

I'll admit, the table did take a little more.  It had a ton of nail holes in it that had to be filled.  (I prefer Elmer's Wood Filler, but as Sabrina Soto would say, "You can get any type of wood filler at your local hardware store."  Just make sure that it is paintable.)  Then, sanding commenced!  Also, I decided to tone down the pink a bit by doing a layer of stain over the paint.  Because of that, I put on two coats of polyurethane over the stain.  The table took a little over 2.5 hours of work total.  However, I did have to wait for the stain to dry overnight and then wait for the poly to dry, twice.  So, it took me a few days from start to finish.  The rocking chair was easier.  It took roughly 1.25 hours and one day. 

This project also was super affordable.  The table cost me $1!


I used 1 can of spray paint ($4.23 w/tax), and I had the wood filler, sandpaper, stain, and polyurethane on hand.  (I have a well stocked garage from project after project after, you get the picture.)


The rocking chair was a little more expensive at $5.  :)


I ended up using 3 cans of spray paint ($12.69).  It had some pesky hard to reach places, which is why I opted for spray paint over hand painting anyway.


Notice the drop cloth and the well-ventilated areas.  I would also recommend a spray paint can handle.  They are available for a few dollars right next to the spray paint at your local hardware store. ;)  They keep your finger from hurting and your hand from cramping.

In summation, this was an easy, affordable project.  Final totals: $22.92 and < 4 hours of work.  Now to sit on the deck and enjoy it with Charlie. 


I think he adds that final touch, don't you?


Tuesday, August 21, 2012

Top 10 - Stores That Make Me Smile

Need some retail therapy?  Here are 10 of my favorite stores (some virtual).  Hopefully your purchases at them will bring a smile to your face, too.  Happy shopping!


This store is located in Nashville (Belle Meade to be precise), 


Monday, August 20, 2012

Dirty Dishes...still :)

(This post was originally published by me on my knitting blog, Sara's Closet, in April 2010. It's that blog's most recent post. (So pathetic!) I thought I would re-post it here and update it with a link to a PDF of the pattern. Because, let's face it...trying to follow a pattern on a blog post sucks. PDFs are so much more user friendly!)


I am one of those people who always has more that one project going on at once. I normally have one BIG project, but I tend to get bored...even if I love it. So, I always have some sort of itty-bitty-easy-peasy-super-quick project as well. Just to get me through the rough patches. For the longest time, it was baby hats. However, recently, I have discovered the crocheted dishcloth. It all started when I spotted this gorgeous skein of Peaches n' Cream that was calling my name.


Yarn: Sara...Sara...Sara...
Me: What?! Oh...you're a pretty little thing!
Yarn: Thank you! You should take me home.
Me: Sorry, I don't have any use for you.
Yarn: People often knit dishcloths with me.
Me: I don't knit dishcloths.
Yarn: But you LOVE to knit!
Me: I don't knit dishcloths.
Yarn: They are quick and easy!
Me:
I don't knit dishcloths.
Yarn: You...could...um...crochet one. Yes! That's it! Crochet one! Didn't your Aunt DeeAnne give you a lovely crocheted dishcloth?
Me: Oh, yes. She is so sweet. And it is just the best dishcloth!
Yarn: There you go! You could make one just like it.
Me:I've already got dishcloths.
Yarn: Isn't your son always complaining that the current dishcloths are too small for his giant 16 yr. old man hands?
Me: Yes, but...
Yarn: And wouldn't I make your kitchen look just lovely?
Me: Certainly, but...
Yarn: Much better than that old thing you've got in there now!
Me: It is getting rather dingy.
Yarn: Can't you just see me? Draping over the faucet...LOvely. Cleaning the dishes...loVEly. Covered in soap bubbles...loveLY!
Me: You would look nice wiping off the table...
Yarn: And look! I only cost $1.47! That's like pocket change! You could make a whole bunch. Like one for each day of the week. That would be a clean dishcloth every day. You'd never have to have an old, dirty dishcloth hanging in your kitchen sink ever again.
Me: Hmm...The Mythbusters did say that the kitchen sponge is the dirtiest/germiest spot in the house.
Yarn: Dirtier than the toilet seat!
Me: You might be on to something here.
By buying you, I would be protecting my family from evil bacteria just waiting to infect them with horrible diseases!
Yarn: Exactly!
Me: And dishcloths are very eco-friendly.
Yarn: Green is the new black!
Me: So I wouldn't only be saving my family from bacteria...I'd be saving the entire planet from certain doom!
Yarn: You'd be like Wonder Woman!


Great Hera! That is one gorgeous dishcloth! (Now if I could just get my son to actually use it!)

Sara's Aunt DeeAnne Dishcloth

Yarn: I used 1 skein of Peaches n' Cream.
Hook: I used a US size G/6-4.25mm


download now


(This is the original that my aunt crocheted. Hers is a bit smaller than mine and she worked a cute single crochet border around the edge. )

Thursday, August 16, 2012

Surprise!


Guess what kind of cupcakes these are...  
(Yes, they're cupcakes even though they look like weird snowballs.)


Wait...


for...


it...


SURPRISE!


Wasn't that fun!

Read on to see how I made these fun treats. 

 Using a boring white cake mix, make the batter according to the directions on the box.  
Separate the batter for color.  I used neon blue, neon purple and neon green. 


Put each individual color into it's own pan or cup if you want cupcakes 
and bake according to the directions on the box. You can mix the colors if you want more of a marble look.


When the cakes are cool, cut the tops from the bottoms.  
Match up the colors that you want together...  


and frost.


(I used a cup as a cheap cake stand to make sure every bit of color was covered.) 


And wha-la! 


Wednesday, August 15, 2012

Hooked on Hercules Hooks

I love infomercials.  I always have.  If it's AS SEEN ON TV it's quite possible it has been seen in my house.  It used to be I would own things before they ever reached stores.  When I was a kid, all I wanted one year for Christmas was a Cybersonic Toothbrush.  I have Zumba on VHS!  Shark Steamer?  Got it.  Zorbeez?  Got 'em.  Orange Glo?  Snuggie?  Miracle Blades?  Please.  Some things work (Heeltastic), and other don't (Smooth Away).  Over the years there has been one thing that stands above the rest and that I love, Love, LOVE!  

Hercules Hooks.
  

While I'm not positive on when they came to market, I distinctly remember using them in our condo after getting married, 7 years ago.  I gave them a try because the late, great Billy Mays was the spokesman.  As infomercial personalities go, he was the best, and he rarely steered me wrong.  

As you can see from the picture, Hercules Hooks are easy to use.  As I look at it now, I know I often skip the twisting and go straight for the pushing.  The claim is they work on all types of walls.  I can only speak for drywall, but they certainly work with that.  The ads also claimed they can hold up to 150lbs (thus "Hercules").  I know I don't have anything that heavy hanging, but I do have heavier mirrors, over-sized pictures and large metal candle sconces hanging from them.  The beautiful thing is that you don't need a stud to hang these heavy things on.  Even better, if there is no stud available, you don't need an anchor!  It really does take about a second to install.  I literally have them in every room of my house, plus extras hanging on my peg board in the garage.  I have never had anything hung by a Hercules Hook fall.  I can't say that about nails, screws, anchors or molly bolts (super screws with anchors built in).  They will make redecorating and hanging large pieces so much simpler.  But wait, there's more! Some packages come with a free laser level!  :)

***Please note, I have only used Hercules Hooks.  I have never tried Monkey Hooks or Super Hooks or any other imposter.  They look like they are the same thing, but I make no promises they are as awesome!***